Skip to content
Nearly three-quarters of vacation rental hosts now offer self check-in. But why? Because it saves time for both hosts and guests. You(host) don’t need to wait around with keys and your guests don’t feel ashamed and stressed about arriving late. In capsule houses, Self check in works even better because they are made for quick, private and simple stays.
Capsule house self check-in simply means a guest can enter and use a capsule house without meeting the host in-person. You(host) set up a smart lock, keypad or coded entry system so that guests can unlock the door on their own. The process mostly includes sharing the entry code or digital key before arrival along with clear instructions. So check-in and check-out happen smoothly without you standing by.
In this guide, you’ll read the 5 steps that you can use to create a self check-in system for your Airbnb capsule house.

Step 1: Map the guest journey
Guests basically go from booking to arrival to checkout in a set pattern. The host must start by mapping the guest journey step by step. For example: booking → pre-arrival message → check-in arrival → stay → checkout message. As a host, you have to decide when to send each message. You can set a schedule so messages always go out at the right time. Also you can include directions, parking tips and quiet hours. For example: You can give parking instructions and remind guests about any house rules in the same message.
You should standardize things so guests get consistent info. The idea is you can craft templates for “Welcome,” “Check-in” and “Check-out.”
Another idea is: code type. If your capsule has reliable Wi-Fi and you manage many units, go with an online smart lock (so you can update codes instantly). But if the network is spotty or any other kinda problem, use offline time-limited codes.
Note: Many offline locks only generate codes within 72 hours of check-in.
So if you choose offline codes, you must create them a few days early. This matters most if guests book last-minute.
In short, step 1 should be more about planning everything. Means decide how and when you’ll communicate from booking to check-out. Doing this up front keeps your process smooth and sets clear expectations for your guests.
Step 2: Prepare hardware and door details
Now time to get hands-on. As a host, you must check the door and hardware so the lock will fit and work well.
First, choose the right lock: a keypad or RFID smart lock. Make sure it can mount on the capsule’s door. Many capsule doors are curved or made of thick metal, so verify that the lock’s mounting plate will match. If the door is very thick, you need a lock rated for that thickness (some locks need 1⅜″–1¾″ door thickness).
Next, look at the lock orientation and latch. Some locks are for left-hand doors or right-hand doors. You have to check which way the door swings. Also measure the latch backset and depth for ensuring the lock’s deadbolt can fully extend into the frame. The point is to test the hardware before final installation. You(host) might temporarily bolt the latch to see if the deadbolt reaches the strike plate cleanly.
Then seal cable paths and check weather stripping. If you are drilling or routing cables, seal around them so rain or pests can’t sneak in. Also test the existing weather stripping on the door especially. Because capsule houses are mostly in exposed sites.
Also, plan for the weather:
- For coastal or humid climates: use stainless-steel or brass screws so they don’t corrode. Anti-corrosion hardware is a must step because salty air eats metal quickly.
- For very cold climates or coastal sites: go for lithium batteries in the lock (see next step) and a lock rated for weather. The lock’s IP or ingress protection rating should be high (IP65 or better) if it’s outdoors or exposed.
Make a checklist of this part so nothing is forgotten. This prep step means when you are doing the final install, the lock will fit right the first time.

Step 3: Door lock setup and first codes
After making the hardware ready, it’s time to set up the lock. You(host) put the door in programming mode (by holding a combination like * + # or using the maker’s app).
The first code you enter is the administrator/master code. This is your own master password for the lock. Pick something strong and write it down in a secure place (never as a sticker on the lock!).
Next, start adding guest codes. For each reservation you add, create a unique code tied to their dates. Also, many locks allow you to enter a start and end time so the code only works during the guest’s stay. Most importantly, set each code’s start and end exactly: it activates at check-in time and expires at checkout time. Plus, make sure the clock on the lock is correct and is synced to your time zone.
Now, test the lock thoroughly once codes are set. Enter a guest code and open the door, then close it. Also, open from the inside. This makes sure the latch and keypad work smoothly in both directions.
Also, plan for low power emergencies. Many locks have a mechanical key slot hidden under a cover. Note where that is and keep the key handy. Some other locks have an “emergency power port” under the panel. So, keep a small battery clip or 9V battery in your toolkit just in case.
Lastly, must store the master code securely (use a password manager or a locked drawer). Never share that with guests or cleaners. The goal of all these tips is always to have a backup.
Here’s a quick vid showing how to set up the door lock on Glamni capsule models.
Step 4: Automate code delivery
Now, you can automate sharing access info with guests. As earlier mentioned, use scheduled message templates to send the code and instructions at the right time. For example: schedule an email or Airbnb message 24–48 hours before arrival. In that message add the access code, a map pin or directions, a simple check-in checklist, parking tips and contact window (like “available 8am–8pm”).
A short message might say: “Hello! Your check-in code is 1234. Here’s a map link and door instructions. Feel free to ask any questions by 7pm arrival.”
Experts say: sending the full check-in guide 24 hours before arrival is ideal. It gives your guests time to read and ask questions. Your first message must be as clear as possible. For example:
- Check-in: Code 1234 (good from 2pm on May 10 to 11am on May 15)
- Entry: Use the keypad by the door, then turn the knob.
- Parking: Free street parking on Elm St (no permit needed).
- Wi-Fi: SSID “GuestNet”, pass “sunnyday”.
24 hours before, guests get everything.
Also, you can send a quick reminder 3–4 hours before check-in. This short note just repeats the code and door steps briefly. It ensures the info is fresh when they arrive.
If you have multiple capsule units, track their codes carefully. It is better to keep a log: guest name, unit number, code, check-in/check-out times. This helps you if something goes wrong. For example: if a code fails or a guest is delayed, you can quickly look up and change that specific code.
Step 5: Check out and reset
When guests leave, lock things down. At checkout time, must expire or delete the guest code. If you are using a platform like Airbnb, this happens automatically (by default 30 min after checkout). But if you manage codes yourself, log in to the lock or app and remove the code or run a “one-tap purge” to clear all temporary codes. Also, test the door briefly to confirm it’s locked to only my master code now.
An important step is to practice good security hygiene. Rotate your admin/master password on a set schedule (like every 6 or 12 months). This prevents any chance that an old keycode or data breach stays valid. Many hosts mostly forget this, but the tip is: treat the lock like any security system and update the master PIN periodically.
Also, keep maintenance records. Note when you last replaced the batteries or if there was a lock incident (like a jammed bolt or software glitch). For example: if you swapped in a fresh lithium battery, write down the date.
Lastly, you must maintain a door toolkit. It is placed on-site in a small container.
Inside you have:
- Spare AA batteries (or whatever your lock uses)
- A backup weather gasket or sealing tape
- Extra screws, bolts, and anchors for the lock
- A secondary keypad unit (if compatible)
Having these on hand means you can fix most problems within minutes. All safety steps save you from calling a handyman at midnight.
Extra Tips
Always make sure the capsule’s door area is well lit. You can install a motion-sensor light above the entry so guests can see the keypad at night.
If your many guests are international, then consider including basic instructions in more than one language. A simple “How to check-in” note in English and the local dominant language can help non-native speakers.
Consider using the capsule’s house manual booklet or a digital guide. This will help you in sharing detailed info (wifi password, appliance instructions, emergency exit) in advance. Guests can view it anytime. pIus you can mention the manual in check-in notes, so they explore it when they get there.
Try to add a quick welcome note (written or digital) with something personal. This shows you care for your guest, even if the check-in was automated.
Every month or after a few bookings, test the lock and code flow as a “dry run.”
You can leave a printed sheet or fridge note with emergency contacts: your number, a co-host, local ambulance or any other. Even though check-in is automated, guests feel safe knowing who to call in a crisis.
FAQs
Wi-Fi is down on arrival.
If the Wi-Fi or cellular network is out when your guest arrives, they may not be able to get a new code. That’s why plan ahead by generating offline time limited codes in advance. As an extra step, keep a spare key and keep a local emergency open plan.
How to handle multiple roles?
Must create separate codes for each role. Like for cleaning staff, another for maintenance. These are not for guests. Some smart lock systems (or property management tools) even let you make ongoing codes just for staff. Also, set those to auto-expire periodically (usually refresh them weekly or monthly for security).
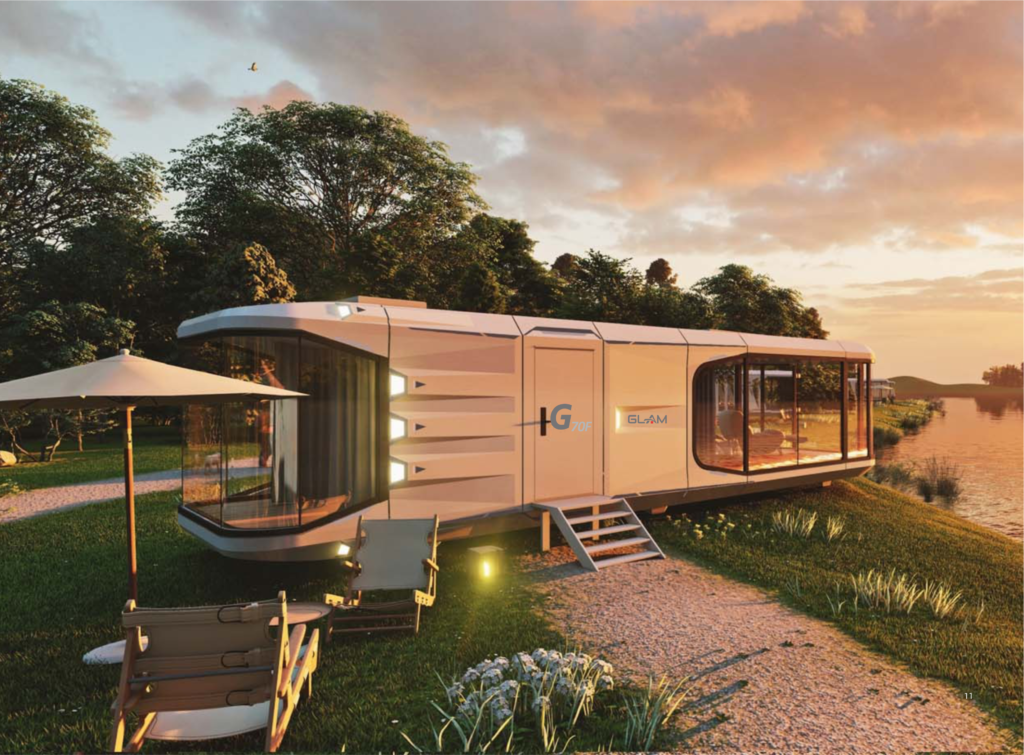
Which Glamni capsule models apply this guide for?
Glamni capsule models like G50F and G70 follow this guide. They have the same door lock setup etc. The exact lock mount may differ by model, so always check the door specs. In any case, ask your supplier about recommended lock options for your model.
Conclusion
Capsule house self check-in for Airbnb hosts becomes smooth and seamless when every step is planned. Mapping out the guest journey keeps communication clear. Hosts who follow these steps make check-in stress free for guests and also simpler for themselves.
If you have plans to invest in a capsule house, then choose one that already supports modern self check-in systems for seamless experience.